


Give your customers more fragrances to discover in one simple product.
Sample packs are one of the easiest ways to introduce customers to your fragrance collection. Instead of committing to a full-sized wax melt, customers can experience several scents in a single purchase, helping them discover new favourites before buying larger quantities.
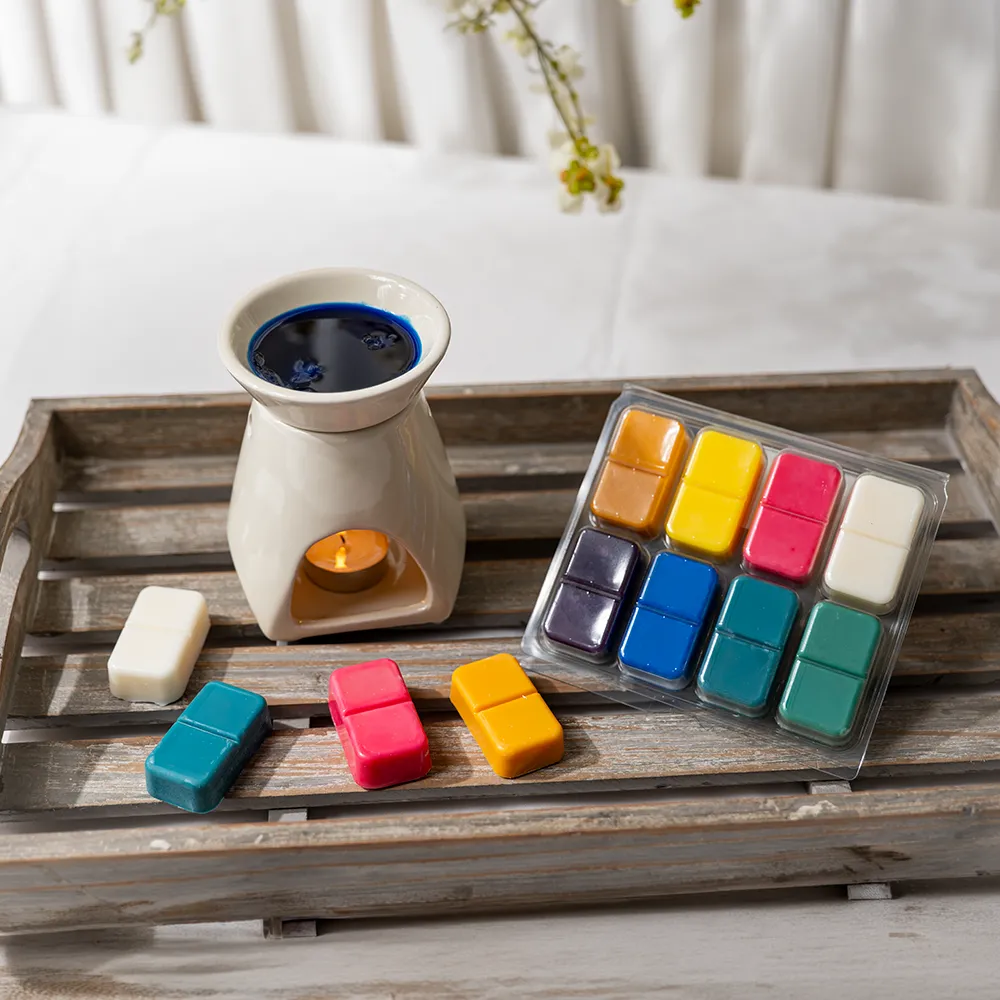
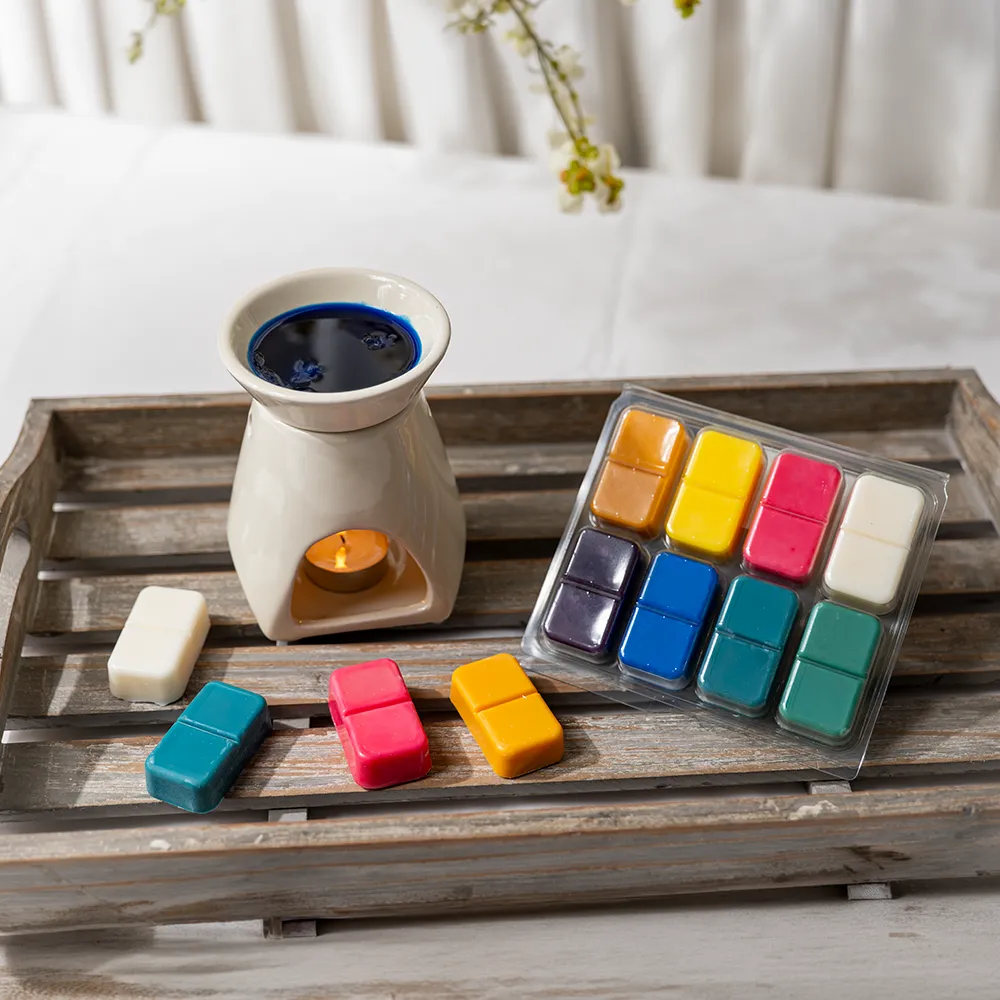
Using a Split 8 Cavity Wax Melt Clamshell, you can create beautifully presented fragrance sample packs that are ideal for selling, gifting, subscription boxes or seasonal collections.
30 Minutes
Time to Complete
beginner
Difficulty
 | £1.80 – £402.90Price range: £1.80 through £402.90 ex VAT | Quantity Max: Min: 1 Step: 1 | |||
| £1.90 – £271.00Price range: £1.90 through £271.00 ex VAT | Quantity Max: Min: 1 Step: 1 | |||
| £1.75 – £257.40Price range: £1.75 through £257.40 ex VAT | Quantity Max: Min: 1 Step: 1 | |||
| £2.20 – £100.00Price range: £2.20 through £100.00 ex VAT | Quantity Max: Min: 1 Step: 1 | |||
| £1.75 – £202.80Price range: £1.75 through £202.80 ex VAT | Quantity Max: Min: 1 Step: 1 | |||
| £2.20 – £100.00Price range: £2.20 through £100.00 ex VAT | Quantity Max: Min: 1 Step: 1 | |||
| £1.90 – £272.00Price range: £1.90 through £272.00 ex VAT | Quantity Max: 100 Min: 1 Step: 1 | |||
| £5.90 – £94.50Price range: £5.90 through £94.50 ex VAT | Quantity Max: Min: 1 Step: 1 | |||
| £2.20 – £100.00Price range: £2.20 through £100.00 ex VAT | Quantity Max: Min: 1 Step: 1 | |||
| £1.90 – £282.00Price range: £1.90 through £282.00 ex VAT | Quantity Max: Min: 1 Step: 1 | |||
| £1.75 – £317.90Price range: £1.75 through £317.90 ex VAT | Quantity Max: Min: 1 Step: 1 | |||
| £1.90 – £258.40Price range: £1.90 through £258.40 ex VAT | Quantity Max: Min: 1 Step: 1 | |||
| £3.50 – £125.00Price range: £3.50 through £125.00 ex VAT | Quantity Max: Min: 1 Step: 1 | |||
| £2.20 – £100.00Price range: £2.20 through £100.00 ex VAT | Quantity Max: Min: 1 Step: 1 | |||
| £2.20 – £100.00Price range: £2.20 through £100.00 ex VAT | Quantity Max: Min: 1 Step: 1 |
- Wax Melter
- Heat proof jug
- Thermometer
- Spatula
- Scales
| Ingredients | SKU | Percentage (%) | Measurements (g) |
| ProSoy Pillar Wax | WAX037 | 90% | 320g |
| Seychelles Fragrance Oil | FRAG0159V2 | 1.25% | 4g |
| English Pear & Freesia Fragrance Oil | FRAG0058V3 | 1.25% | 4g |
| Sage & Sea Salt Fragrance Oil | FRAG0121V2 | 1.25% | 4g |
| Peony & Blush Suede Fragrance Oil | FRAG0108V2 | 1.25% | 4g |
| Flower Bomb Fragrance Oil | FRAG0063V2 | 1.25% | 4g |
| Angel Fragrance Oil | FRAG0007 | 1.25% | 4g |
| Linen Fresh Fragrance Oil | FRAG0169V2 | 1.25% | 4g |
| Sanctuary Spa Fragrance Oil | FRAG0327V2 | 1.25% | 4g |
| Liquid Candle Dye Red | LDYE005BT | As desired | |
| Liquid Candle Dye Yellow | LDYE006BT | As desired | |
| Liquid Candle Dye Orange | LDYE003BT | As desired | |
| Liquid Candle Dye Green | LDYE002BT | As desired | |
| Liquid Candle Dye Teal | LDYE009BT | As desired | |
| Split 8 Cavity Wax Melt Clamshell | CLAM20 | – | 2 |
This recipe makes 2 x Split 8 Cavity Wax Melt Clamsell
Step 1: Prepare Your Workspace
Clean and sanitise your work surface before beginning. Place your empty clamshells on a flat, heat-resistant surface.
Make sure your clamshells are completely dry and free from dust. Have all your equipment, fragrance oils and labels ready before melting the wax.
Step 2: Choose Your Fragrances
Decide how many fragrances you would like to include in the sample pack.
A split 8-cavity clamshell can be used to create:
- Eight individual fragrance samples
- Four fragrances with two cavities of each scent
- Two fragrances with four cavities of each scent
Plan which fragrance to pour into each cavity before you begin.
Step 3: Melt the Wax
Weigh the required amount of wax and place it into your melting pot or double boiler.
Heat the wax slowly and gently until it has completely melted. Avoid overheating the wax.
Step 4: Divide the Melted Wax
Once the wax has melted, divide it between separate pouring jugs for each fragrance.
For example, when making a four-fragrance sample pack, divide the melted wax evenly between four jugs.
Use your digital scales to ensure each jug contains the correct amount.
Step 6: Add the Fragrance Oil
Weigh the fragrance oil separately for each jug.
Always use the fragrance percentage recommended by your wax supplier and ensure the fragrance oil is suitable for use in wax melts.
For example, when using a 10% fragrance load with 20g of wax, you would add 2g of fragrance oil.
Add the fragrance oil at the temperature recommended by your wax supplier.
Step 7: Stir the Wax and Fragrance
Stir each wax and fragrance mixture slowly and thoroughly.
Continue stirring for approximately one to two minutes to help the fragrance oil distribute evenly throughout the wax.
Use a separate clean stirring utensil for each fragrance to prevent the scents from mixing.
Step 8: Allow the Wax to Cool Slightly
Allow each wax mixture to cool to the recommended pouring temperature.
Pouring at the correct temperature can help improve the finish of the wax melts and reduce problems such as frosting, cracking or sinkholes.
The ideal pouring temperature will depend on the wax you are using, so always follow your wax supplier’s instructions.
Step 9: Pour the First Fragrance
Carefully pour the first fragrance into its chosen cavity or section of the clamshell.
Pour slowly to prevent splashing and avoid filling above the dividing lines.
Do not close the clamshell while the wax is still warm.
Step 10: Pour the Remaining Fragrances
Repeat the process with each fragrance until all eight cavities have been filled.
Take care not to drip one fragrance into another cavity. Wipe the edge of the pouring jug before moving between sections if necessary.
Check that each cavity has been filled evenly.
Step 11: Leave the Wax Melts to Set
Leave the clamshell open and undisturbed on a flat surface.
Allow the wax melts to cool completely at room temperature. Avoid moving the clamshell while the wax is setting, as this may cause uneven surfaces or spills.
Do not place the warm clamshell in the fridge or freezer unless specifically recommended by your wax supplier.
Step 12: Check the Finished Sample Pack
Once the wax has completely cooled, check each cavity for:
- Cracks
- Sinkholes
- Spills
- Uneven filling
- Fragrance contamination between sections
- Damage to the clamshell
Small imperfections may be corrected using a heat gun on a low setting, but take care not to melt or warp the plastic packaging.
Step 13: Allow the Wax Melts to Cure
Leave the wax melts to cure for the period recommended by your wax manufacturer.
Curing allows the wax and fragrance oil to bind together properly and may improve the strength and performance of the fragrance.
Depending on the wax, the curing period may range from a few days to approximately two weeks.
Step 14: Label Each Fragrance
Clearly identify the fragrance contained in each section.
You could use:
- A numbered fragrance guide
- Small labels beside each cavity
- A printed scent card
- A label on the back of the clamshell
- A colour-coded fragrance key
Make sure customers can easily match each wax melt to the correct fragrance name.
Step 15: Add the Required Safety Information
Add all legally required product and safety information before selling or giving the sample pack to customers.
This may include:
- CLP information
- Allergen information
- Warning statements
- Supplier or business details
- Product weight
- Batch information
- Instructions for safe use
The required information will depend on your location, ingredients and how the product is supplied.
Step 16: Close and Package the Clamshell
Once the wax melts have fully cooled and cured, close the clamshell securely.
Please add your branding, fragrance guide, and any additional packaging. Store the finished sample packs in a cool, dry location away from direct sunlight and strong heat.
Your split 8-cavity wax melt sample pack is now ready to sell, gift or use as a fragrance tester.
Why Create Wax Melt Sample Packs?
Offering fragrance sample packs can help:
- Introduce customers to new fragrance collections
- Increase average order value
- Encourage repeat purchases
- Reduce hesitation when trying new scents
- Create seasonal or themed gift sets
- Use multiple fragrances in one professional product
They’re also perfect for makers launching a new fragrance range or showcasing bestselling scents.
Ideas for collections:
Floral Collection
- Peony & Blush Suede
- English Pear & Freesia
- Fresh Linen
- Velvet Rose & Oud
- Jasmine Sambac & Marigold
- Lavender
- Cherry Blossom
- Elderflower & Garden Mint
Fruity Collection
- Watermelon Sugar
- Plum & Rhubarb
- Blueberry & Vanilla
- Tropical
- Strawberry
- Coconut & Lime
- Sweet Orange
- Lemon & Lime
Autumn Collection
- Crisp Fall Night
- Spice Pumpkin
- Autumn
- Hot Mulled Apple Cider
- Treacle Toffee
- Maple & Pecan
- Vanilla
- Dark Honey & Tobacco
Christmas Collection
How many fragrances can I fit into a split 8-cavity wax melt clamshell?
A split 8-cavity clamshell can hold up to eight different fragrances, one in each cavity. You can also use fewer fragrances by filling multiple cavities with the same scent.
What type of wax is best for split clamshell wax melts?
Most container-style waxes designed for wax melts work well, including soy, paraffin and blended waxes. Always follow the manufacturer’s recommended melting and pouring temperatures.
Can I pour different fragrances into the same clamshell?
Yes. The split design keeps each fragrance separate, making it ideal for creating sample packs with a variety of scents.
How do I stop fragrances from mixing together?
Pour carefully into each individual cavity, avoid overfilling, and wipe the pouring jug between fragrances if needed. Allow the wax to settle before moving the clamshell.
How much wax does an 8-cavity split clamshell hold?
The capacity varies depending on the manufacturer. Check the product specifications or weigh the clamshell filled with water to estimate its capacity before making your wax melts.
How long should wax melts cure before use?
The curing time depends on the type of wax you use. Many soy wax melts benefit from curing for 7–14 days, while other waxes may require less time. Follow your wax supplier’s recommendations for the best fragrance throw.
Can I use a split clamshell for seasonal sample collections?
Absolutely. Split clamshells are perfect for creating themed collections, such as Christmas, autumn, spring or floral scent selections, allowing customers to try multiple fragrances in one pack.
Are split 8-cavity clamshells suitable for beginners?
Yes. They are easy to fill and are a great option for beginners wanting to create professional-looking wax melt sample packs with multiple fragrances.
How should I label a wax melt sample pack?
You can include a scent guide, number each cavity, or apply a label to the back of the clamshell listing each fragrance. Don’t forget to include any legally required CLP and safety information.
How should I store finished wax melt sample packs?
Store wax melts in a cool, dry place away from direct sunlight and heat. Keeping them sealed until use helps preserve the fragrance for longer.
Can I sell wax melt sample packs?
Yes, provided your products comply with all relevant regulations in your country, including fragrance compliance, CLP labelling (where required), and product safety requirements.
Why should I offer wax melt sample packs?
Sample packs are an excellent way to introduce customers to new fragrances, encourage repeat purchases, and help shoppers discover their favourite scents before buying full-size wax melts.